This post will cover how to create Anaconda virtual environments and the important things to keep in mind during the process. Python is a widely used programming language in fields such as data science, web development, and automation. Developers or data scientists using Python may need different libraries and packages depending on the specific project or task. In such cases, you can use Anaconda to create virtual environments tailored to the task at hand.
Table of Contents
What Is Anaconda?
Anaconda is a data science platform for Python and R programming languages. It includes various data science libraries and packages, making it easy for developers to install and manage the tools they need. Anaconda is especially optimized for managing virtual environments, allowing you to maintain separate environments independently for different projects.
What Is a Virtual Environment?
A virtual environment allows you to run multiple Python environments independently on a single computer. For example, if Project A requires Python 3.7 and Project B requires Python 3.9, you can use virtual environments to install and use the specific Python version and packages needed for each project. This approach helps prevent conflicts between packages or Python versions.
Installing Anaconda
To use Anaconda, you must first install the Anaconda distribution. Anaconda can be downloaded from its official website, and the installation process is straightforward. It supports various operating systems, including Windows, macOS, and Linux, so you can install the version that matches your system. Once installed, you will have access to a command-line tool called ‘Anaconda Prompt.’
Creating, Deleting, Activating, and Deactivating Anaconda Virtual Environments
Let’s now look at how to create, delete, activate, and deactivate Anaconda virtual environments.
Creating a Virtual Environment
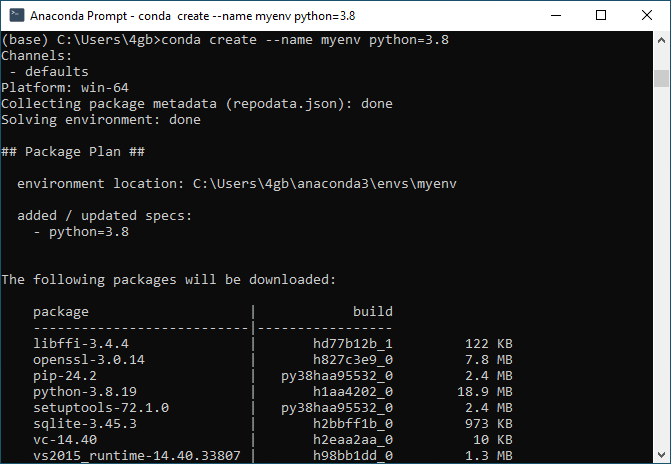
To create a virtual environment, run ‘Anaconda Prompt’ on Windows or open the terminal on Linux or macOS and enter the following command in bash or zsh. Here, myenv is the name of the virtual environment, and python=3.8 specifies the Python version to be used in that environment. You can change the environment name and Python version as needed.
conda create --name myenv python=3.8When you run the environment creation command in the Anaconda Prompt on Windows 10, you’ll see the path of the virtual environment, the Python version, the names and versions of the packages to be downloaded, and their sizes.

You will then be prompted to confirm the installation of the new packages by pressing y.

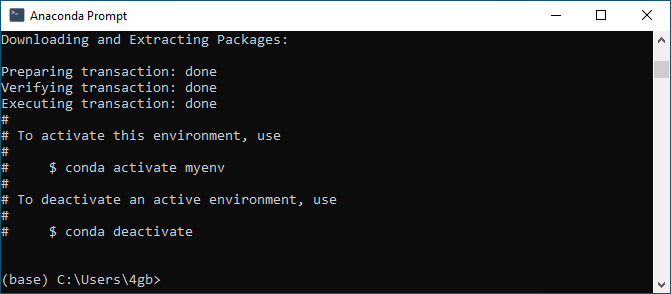
Once all the necessary tasks for setting up the new virtual environment are complete, the process ends with instructions on how to activate and deactivate the environment.

Activating a Virtual Environment
To activate the virtual environment you just created, use the following command:
conda activate myenvWhen you enter this command, the myenv virtual environment is activated, and any packages you install afterward will be installed within this environment. The name of the activated virtual environment appears at the beginning of the command prompt in parentheses, such as (base) or (myenv), indicating that you have switched from the base environment to the myenv environment.

Deactivating a Virtual Environment
After finishing your work, you can deactivate the virtual environment and return to the base environment by using:
conda deactivateWhen you deactivate the currently active virtual environment, if you have a base environment, it will switch back to the base environment.

Deleting a Virtual Environment
If you no longer need a virtual environment, you can delete it using the following command:
conda env remove -n myenv
# 또는
conda-env remove -n myenv
As shown below, you will be notified that the myenv virtual environment and all its installed packages will be deleted. It’s important to note that deleted virtual environments cannot be recovered, so be sure to delete them carefully.

Considerations
Preventing Package Conflicts
If you don’t use virtual environments and use the same environment for all projects, package conflicts can arise. For example, Project A might require version 1.0 of a particular library, while Project B requires version 2.0. Without virtual environments, the requirements of one project could affect another. Therefore, it’s crucial to use virtual environments to set up the appropriate environment for each project.
Naming Your Environments
It’s important to name your virtual environments intuitively and clearly. For instance, if you’re using a virtual environment for a data analysis project, naming it something like data_analysis would be helpful. This approach minimizes confusion when managing multiple virtual environments later.
Installing Packages
When installing packages within a virtual environment, you can use the conda command or pip if a particular package is not available through conda. However, mixing conda and pip installations can sometimes lead to compatibility issues. It’s generally best to prioritize using conda and only use pip when necessary.
Cannot Delete the Currently Active Environment
If the myenv virtual environment is currently active, you cannot delete it. If you attempt to do so, you’ll receive an error message like “CondaEnvironmentError: cannot remove current environment. deactivate and run conda remove again.” Therefore, ensure that you deactivate the environment using conda deactivate before attempting to delete it.

Summary
Anaconda virtual environments are a powerful tool for setting up independent Python environments for each project, preventing package conflicts, and managing necessary packages and Python versions. By effectively utilizing virtual environments, you can reduce project complexity and maintain a more efficient development environment. Virtual environments are essential, especially when working on multiple projects simultaneously or developing for specific environments. Finally, when creating and managing virtual environments, be sure to follow the considerations to maintain a stable and efficient work environment.
