In this post, we’ll explore how to install Anaconda on Linux in detail. We will also look into some precautions during the installation process and discuss useful ways to leverage Anaconda effectively.
Table of Contents
What is Anaconda?
For Linux users setting up a Python development environment, Anaconda is one of the most convenient and powerful tools available. Anaconda is a package manager and environment management tool that allows you to install and manage the libraries and tools needed for data science, machine learning, artificial intelligence, and more.
Anaconda manages packages and environments for both Python and R programming languages. It is widely used in data science and machine learning and includes various data processing and analysis tools. In addition to the standard Python libraries, Anaconda comes with useful libraries like NumPy, Pandas, and Scikit-learn, allowing you to start working on various tasks right after installation.
Virtual Environment Management
Anaconda offers virtual environment management, allowing you to configure independent Python environments for different projects. By using this feature, you can install libraries that are only needed for specific projects or manage projects that use different versions of Python simultaneously.
Package Manager
Anaconda includes a powerful package manager called Conda. This package manager can install and manage not just Python packages, but also packages suited for various languages and platforms. Conda simplifies package installation without dependency issues, and updating or removing packages is also straightforward.
How to Install Anaconda
Let’s walk through the process of downloading and installing the installation file to install Anaconda on Linux.
Download Installation File
To install Anaconda on Linux, you need to download the Anaconda installation file for Linux. There are two ways to download it: accessing the Anaconda website and downloading the file directly or using the wget command in the terminal. Let’s explore both methods.
GUI Method
Access the Anaconda download page in your web browser, click the green button with the penguin icon and the word “Download” to download the file.

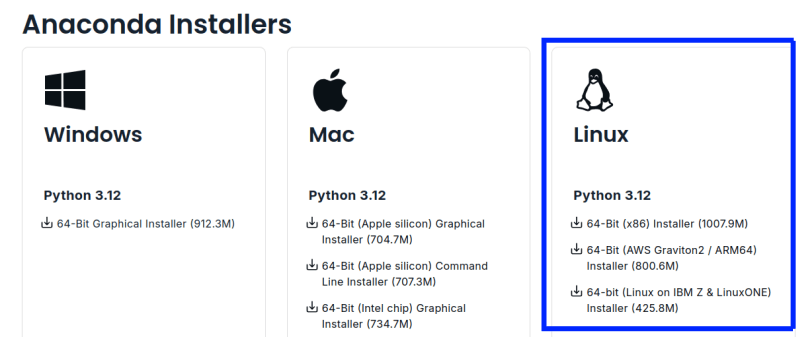
Alternatively, if you scroll down a bit, you’ll find “Anaconda Installers.” From there, you can download the appropriate file for your device under the Linux box on the far right.

CLI Method
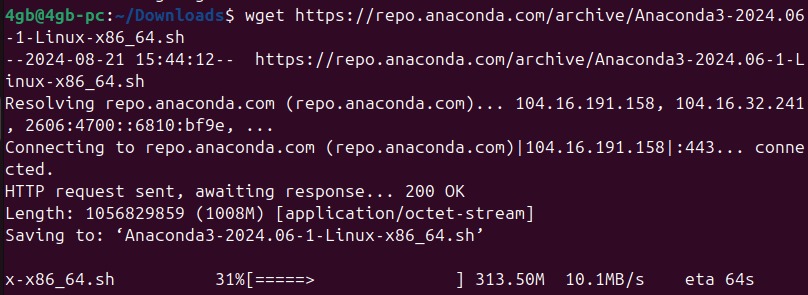
To install Anaconda, you first need to download the installation file from the official website. Linux users can download the Anaconda installation script using the wget command in the terminal. As of August 21, 2024, the latest file is 2024.06-1. Make sure to download the appropriate version for your device.
# x86 64Bit
wget https://repo.anaconda.com/archive/Anaconda3-2024.06-1-Linux-x86_64.sh
# AWS Graviton2 / ARM64
wget https://repo.anaconda.com/archive/Anaconda3-2024.06-1-Linux-aarch64.sh
# IBM Z & LinuxONE
wget https://repo.anaconda.com/archive/Anaconda3-2024.06-1-Linux-s390x.sh
This command downloads the latest Anaconda installation file to the current directory. Keep in mind that the installation file’s URL may vary depending on the Anaconda version. Therefore, it is recommended to check the latest version link on the Anaconda website before use.

Installation Process for Anaconda on Linux
After downloading the installation script, you can proceed to install Anaconda. First, grant execution permission to the script. Here, we’ll proceed based on the x86_64 version of the file.
chmod +x Anaconda3-2024.06-1-Linux-x86_64.shNext, run the installation script.
./Anaconda3-2024.06-1-Linux-x86_64.shWhen the installation script runs, the terminal will display the license agreement and installation path configuration. If you follow the default settings, you can simply press Enter to continue without making any changes.

You will need to agree to the terms and conditions before proceeding. Type “yes” and press Enter.

The installer will ask where to install Anaconda3. By default, it installs in ~/anaconda3. If you wish to specify a different location, you can input the path. I’ll proceed with the default path, so I’ll just press Enter.

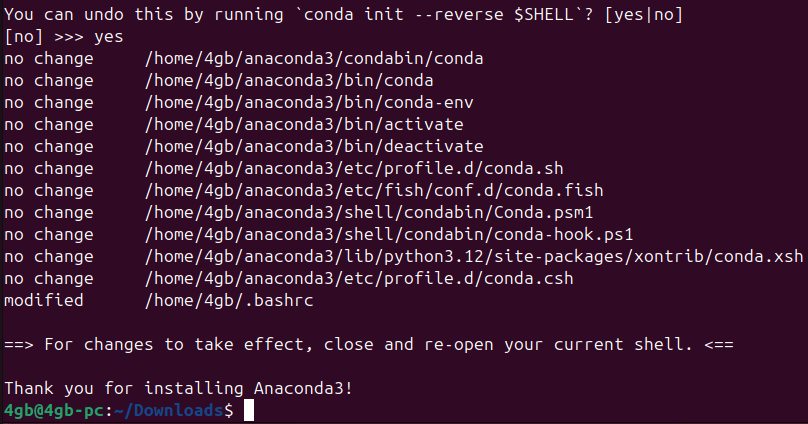
Once the installation is complete, the installer will ask if you want to initialize Conda to update the shell profile. It is recommended to type “yes” here, as it will save you from manually configuring PATH settings later.

After choosing “yes,” you will be informed that the initialization was successful and asked to close and reopen your current shell to apply the changes.

PATH Configuration
If you initialized Conda earlier, you shouldn’t encounter any issues. However, if you skipped initialization, you need to configure the system’s PATH environment variable manually to ensure Anaconda functions correctly. You can modify the .bashrc file as follows if you need to set it manually after installation:
echo 'export PATH="$HOME/anaconda3/bin:$PATH"' >> ~/.bashrc
source ~/.bashrc
This command adds the Anaconda installation path to PATH and applies the changes immediately.
Installation Verification
Once installation is complete, you can verify that Anaconda was installed correctly by typing the following commands in the terminal:
conda --version
python --version
If installed correctly, the Conda version information will be displayed.

If you encounter “conda: command not found” when trying to run Conda, revisit the PATH Configuration section and adjust the settings, or completely remove Anaconda and reinstall it as follows:
rm -rf ~/anaconda3
~/Downloads/Anaconda3-2024.06-1-Linux-x86_64.sh
Useful Tips
Creating and Managing Virtual Environments
One of the biggest advantages of Anaconda is how easily it allows you to manage virtual environments. With virtual environments, you can independently install and manage different Python packages for each project. The basic command to create a virtual environment is as follows:
conda create --name myenvHere, myenv is the name of the virtual environment. To activate this virtual environment, use the following command:
conda activate myenvTo exit the environment, enter the following command:
conda deactivateInstalling and Managing Packages
Using Conda, you can easily install packages. For example, to install the NumPy package, use the following command:
conda install numpyTo check the list of installed packages, use the following command:
conda listThis command displays all installed packages, and you can remove unnecessary packages with the conda remove command.
Precautions
Choosing Installation Path
When installing Anaconda, it’s important to choose the installation path carefully. While it typically installs in your home directory, you can opt for a different path. However, unless you need to share the Anaconda environment with other system users, it’s recommended to use the default path.
Configuring PATH
It is highly recommended to initialize Conda during the installation process. If not, don’t forget to manually configure the PATH environment variable after installation. If the PATH isn’t properly set, you won’t be able to use Anaconda and Conda commands. In such a case, you might need to manually configure the PATH or reinstall Anaconda.
Updating Anaconda
Anaconda is regularly updated, so it’s advisable to update it periodically to take advantage of new features or apply security patches. The update commands are as follows:
conda update conda
conda update anaconda
These commands will update Conda and Anaconda to the latest versions.
Summary
In this guide, we have explored the process of how to install Anaconda on Linux, along with some important precautions to keep in mind during installation. Anaconda is an incredibly useful tool for working on data science and machine learning tasks in a Linux environment. The installation process is simple, and it allows convenient management of virtual environments and packages, enabling you to create independent environments for each project. Pay attention to PATH settings and installation path selection during installation, and keep your Anaconda installation up to date to maintain optimal performance. By effectively utilizing Anaconda, you can manage your development environment more efficiently on Linux.
